React PubSub using Diffusion Websocket Server
July 8, 2024 | Holger Schmitz
Introduction
In the context of web development, user experience is probably the most important principle. One effective way to improve user experience is through the use of real-time data. Incorporating real-time updates, without the need for manual page refreshes, creates a seamless and dynamic interaction with a web application. The Diffusion JavaScript client connects the browser application directly with the Diffusion server and allows real-time data streaming, ensuring low latency.
React, one of the most popular frameworks for building web applications, provides a robust foundation for dynamic applications. In combination with state management libraries such as Jotai, Redux or Recoil, React is an ideal candidate for handling real-time data updates efficiently in the client of a web application.
This blog post demonstrates how to use the Diffusion JavaScript client together with React, NextJS and Jotai to build a real-time, internet scale web application. The example will focus on a fleet monitoring system, showcasing how real-time updates can be implemented to display vehicle data synamically.
Setting up the project
Let’s start by creating a new NextJS application. In a terminal, run the following command, choose a project name and answer yes to all questions.
npx [email protected]
This will create a folder with the project name and set it up with the skeleton of a NextJS application. Exact version numbers are used to improve reproducability. We need two additional libraries for the project. The Diffusion JavaScript client connects to the Diffusion server and receives updates in real-time. The Jotai state management library is a simple yet powerful library that manages state across components. To install the two libraries, navigate into the folder and run the command below.
npm install --save-exact [email protected] [email protected]
In this project, we will be using the ability of NextJS to create static exports. Static exports create a folder with HTML, CSS, and JavaScript files that can be deployed to any web server. During the set-up, create-next-app should have created a file called next.config.mjs in the root folder of the project. To configure NextJS to produce static exports, modify the nextConfig property in this file to include the property output: ‘export’.
Subscribing to Diffusion
Because the default configuration of NextJS uses Typescript, we first need to declare the data type that we are expecting to receive. For our fleet tracking application, we will be using vehicle data indexed by the vehicle ID. To define the types, create a new file src/lib/fleet.ts with the following content:
export interface Vehicle {
    id: string;
    driver: string;
    // geographic coordinates
    location: {
        latitude: number;
        longitude: number;
    },
    // vehicle speed in km/h
    speed: number;
    // vehicle status
    status: string;
    // fuel level in litres
    fuel: number;
    // next destination
    destination: string;
    // last update timestamp
    lastUpdate: number;
}

export type FleetData = {[id: string]: Vehicle};
Using these types we can implement the subscription to the Diffusion topics. In this example, we assume that each vehicle of the fleet has a separate topic that is regularly updated with the latest vehicle data. The topic path for each vehicle is vehicle/<vehicle-id>, where <vehicle-id> is the ID string of the vehicle. Each topic can be subscribed to by a JSON stream containing the vehicle data. Let’s put the code subscribing to the Diffusion topics into the function subscribeToFleetData in the file app/lib/subscribe.ts.
import * as diffusion from 'diffusion';
import {
    FleetData,
    Vehicle
} from './fleet';
export async function subscribeToFleetData(setFleet: (cb: (oldValue: FleetData) => FleetData) => void): Promise < diffusion.Session > {
    const session = await diffusion.connect({
        principal: '',
        credentials: '',
        host: '',
    });
    const vehicleStream = session.addStream('?vehicles//', diffusion.datatypes.json());
    vehicleStream.on('value', (topic, spec, newValue, oldValue) => {
        const vehicle = newValue.get() as Vehicle;
        setFleet((fleet: FleetData) => ({
            ...fleet,
            [vehicle.id]: vehicle
        }));
    });
    await session.select('?vehicles//');
    return session;
}
There are a few things to note here. Firstly, subscribeToFleetData takes a function setFleet as argument. This function itself takes a callback as argument which transforms an existing value from the local data store into an updated version. The data store stores the fleet data and each time the Diffsion value stream receives an update, we create copy the existing fleet data and add or update the single vehicle passed to the value stream. Also, note that we are using the split path selector ?vehicles// to subscribe to all topics under the vehicles topic. Finally, we are returning the session object to the caller of subscribeToFleetData. This allows the caller to close the session when the connection should be closed.
Creating the data provider
Jotai uses a concept called atoms to share global state. Atoms contain units of data. React components can update and subscribe to the data using hooks. This allows changes in the atom’s data to automatically trigger updates of the component. A Jotai atom can be created with just a few lines of code. In a file app/lib/fleet-atom.ts, all that needs to be done is to import the atom function from jotai and our FleetData type and then export a global constant fleetAtom that is created by calling the atom function with an initial value.
import {
    atom
} from 'jotai';
import {
    FleetData
} from './fleet';
export const fleetAtom = atom < FleetData > ({});
With this, fleetAtom is a variable that allows access to the global reactive state. We can now implement a React component in new file app/components/FleetDataProvider.tsx that acts as a data provider and updates the atom’s state.
"use client";
import {
    useEffect
} from 'react';
import {
    useSetAtom
} from 'jotai';
import {
    fleetAtom
} from '../lib/fleet-atom';
import {
    subscribeToFleetData
} from '../lib/subscribe';
export default function FleetDataProvider({
    children
}: {
    children: React.ReactNode
}) {
    const setFleet = useSetAtom(fleetAtom);
    useEffect(() => {
        const sessionPromise = subscribeToFleetData(setFleet);
        return () => {
            sessionPromise.then(session => session.close());
        };
    }, [setFleet]);
    return < > {
        children
    } < />;
}
We use Jotai’s useSetAtom with our fleetAtom to obtain a setter function to update the state. This function has the signature required by the subscribeToFleetData function that we implemented in the previous section. We can then use React’s useEffect hook to subscribe to the fleet data when the component is mounted into the DOM. Remember that subscribeToFleetData returns a Promise to a Session object. We deliberately leave the promise unresolve and don’t use await on the call to subscribeToFleetData. The callback passed to useEffect can return a function that will be called during clean-up of the component. We use this provision to return a function that waits for the resolution of the session promise and then closes the session. Finally, note the “use client” directive at the top of the file. This tells NextJS to render this component inside the client and prevents server side rendering (SSR).
To use FleetDataProvider in our little demo, edit the global layout app/layout.tsx and modify the contents of the HTML body inside the return value to the following :
<body className = "bg-white" >
  < FleetDataProvider >
    {children}
  </FleetDataProvider>
</body >
Displaying the Vehicle Data
Now that all the plumbing is in place, we can create a component that displays the fleet data in real time. All that is needed for this is Jotai’s useAtomValue hook together with the fleetAtom defined in the previous section. This gives us access to the object containing all the vehicles indexed by their ID. To turn this into an array, we take the object keys, sort them alphabetically and then turn this into an array of Vehicle data. This data can then be displayed as rows in an HTML table. Putting all this together, we end up with the following code that we can place into app/page.tsx.
"use client"

import { useAtomValue } from 'jotai';
import { fleetAtom } from './lib/fleet-atom';

export default function Home() {
  const fleet = useAtomValue(fleetAtom);
  const vehicles = Object.keys(fleet).sort().map(id => fleet[id]);
  return (
    <main className="flex min-h-screen flex-col items-center justify-between p-24">
      <table className="w-full table-fixed">
        <thead>
          <tr>
            <th className="w-1/6">Vehicle ID</th>
            <th className="w-1/6">Driver</th>
            <th className="w-12">Speed</th>
            <th className="w-24">Status</th>
            <th className="w-12">Fuel</th>
            <th className="w-1/6">Location</th>
            <th className="w-1/6">Destination</th>
          </tr>
        </thead>
        <tbody>
          {vehicles.map(vehicle => (
            <tr key={vehicle.id} className="even:bg-gray-50 odd:bg-white">
              <td>{vehicle.id.split('-')[0]}</td>
              <td>{vehicle.driver}</td>
              <td>{vehicle.speed}</td>
              <td>{vehicle.status}</td>
              <td>{vehicle.fuel}</td>
              <td>{vehicle.location.latitude}, {vehicle.location.longitude}</td>
              <td>{vehicle.destination}</td>
            </tr>
          ))}
        </tbody>
      </table>
    </main>
  );
}
We included some styling using Tailwind, the default CSS framework when creating a new NextJS application. Running npm run dev and opening <http://localhost:3000/> will show a table with the vehicle data listed by their ID.
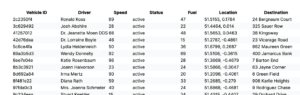
Note, that we have not included the source of the data in this tutorial. In the image shown above, the data was generated by a separate server side script that uses Faker-JS to randomly generate data and feeds it to the Diffusion server.
Summary
In this little tutorial, we have shown how to use Diffusion with React and NextJS to display real time data in a browser application. Using the Web Sockets that underly the Diffusion protocol, the browser can connect directly to a Diffusion server, thus minimising latency. We have used Jotai, a state management library to pass the real time data from a provider to the components. We have inclded the provider in the global layout, making it global across the whole web application. Naturally, it is also possible, to use the provider in a more local layout inside the NextJS routing hierarchy to create scoped data sources. Closing the Diffusion sessions in the clean-up ensures that connections don’t remain open when they are not needed.
We hope that this example convinces you that using Diffusion with React, NextJS and Jotai is an easy way to incorporate real-time data into your web application.
Further reading

BLOG
Creating a WebSocket Server for PubSub
June 28, 2024
Read More about Creating a WebSocket Server for PubSub/span>
BLOG
The Game-Changer: Change Data Capture (CDC)
March 17, 2025
Read More about The Game-Changer: Change Data Capture (CDC)/span>
BLOG
How Real-Time Data Powers Sportsbooks During the Super Bowl
February 03, 2025
Read More about How Real-Time Data Powers Sportsbooks During the Super Bowl/span>


